Caseworker
werk · taken
Caseworker is the personal work queue for case handlers. It brings together the tasks, claims and deadlines that belong to your cases, shows where each task stands in its process, and has a built-in assistant to help with quick assessment.
On opening the board you land on the Taken inbox in the Werk mode: your tasks on the left, the one you pick on the right, so you can take up the next piece of work without hunting for it across other boards.
Caseworker is also the one board of Gemeente Amsterdam, Gemeente Heusden, Dienst Toeslagen and Univé Verzekeringen, whose caseworkers open it with Inloggen als medewerker on their own organisation's landing page — see Organisation landing pages. Each organisation's caseworkers see the tasks of their own organisation's cases: at Gemeente Heusden, for example, the tasks of the Heusdenpas applications residents submit in the citizen portal.
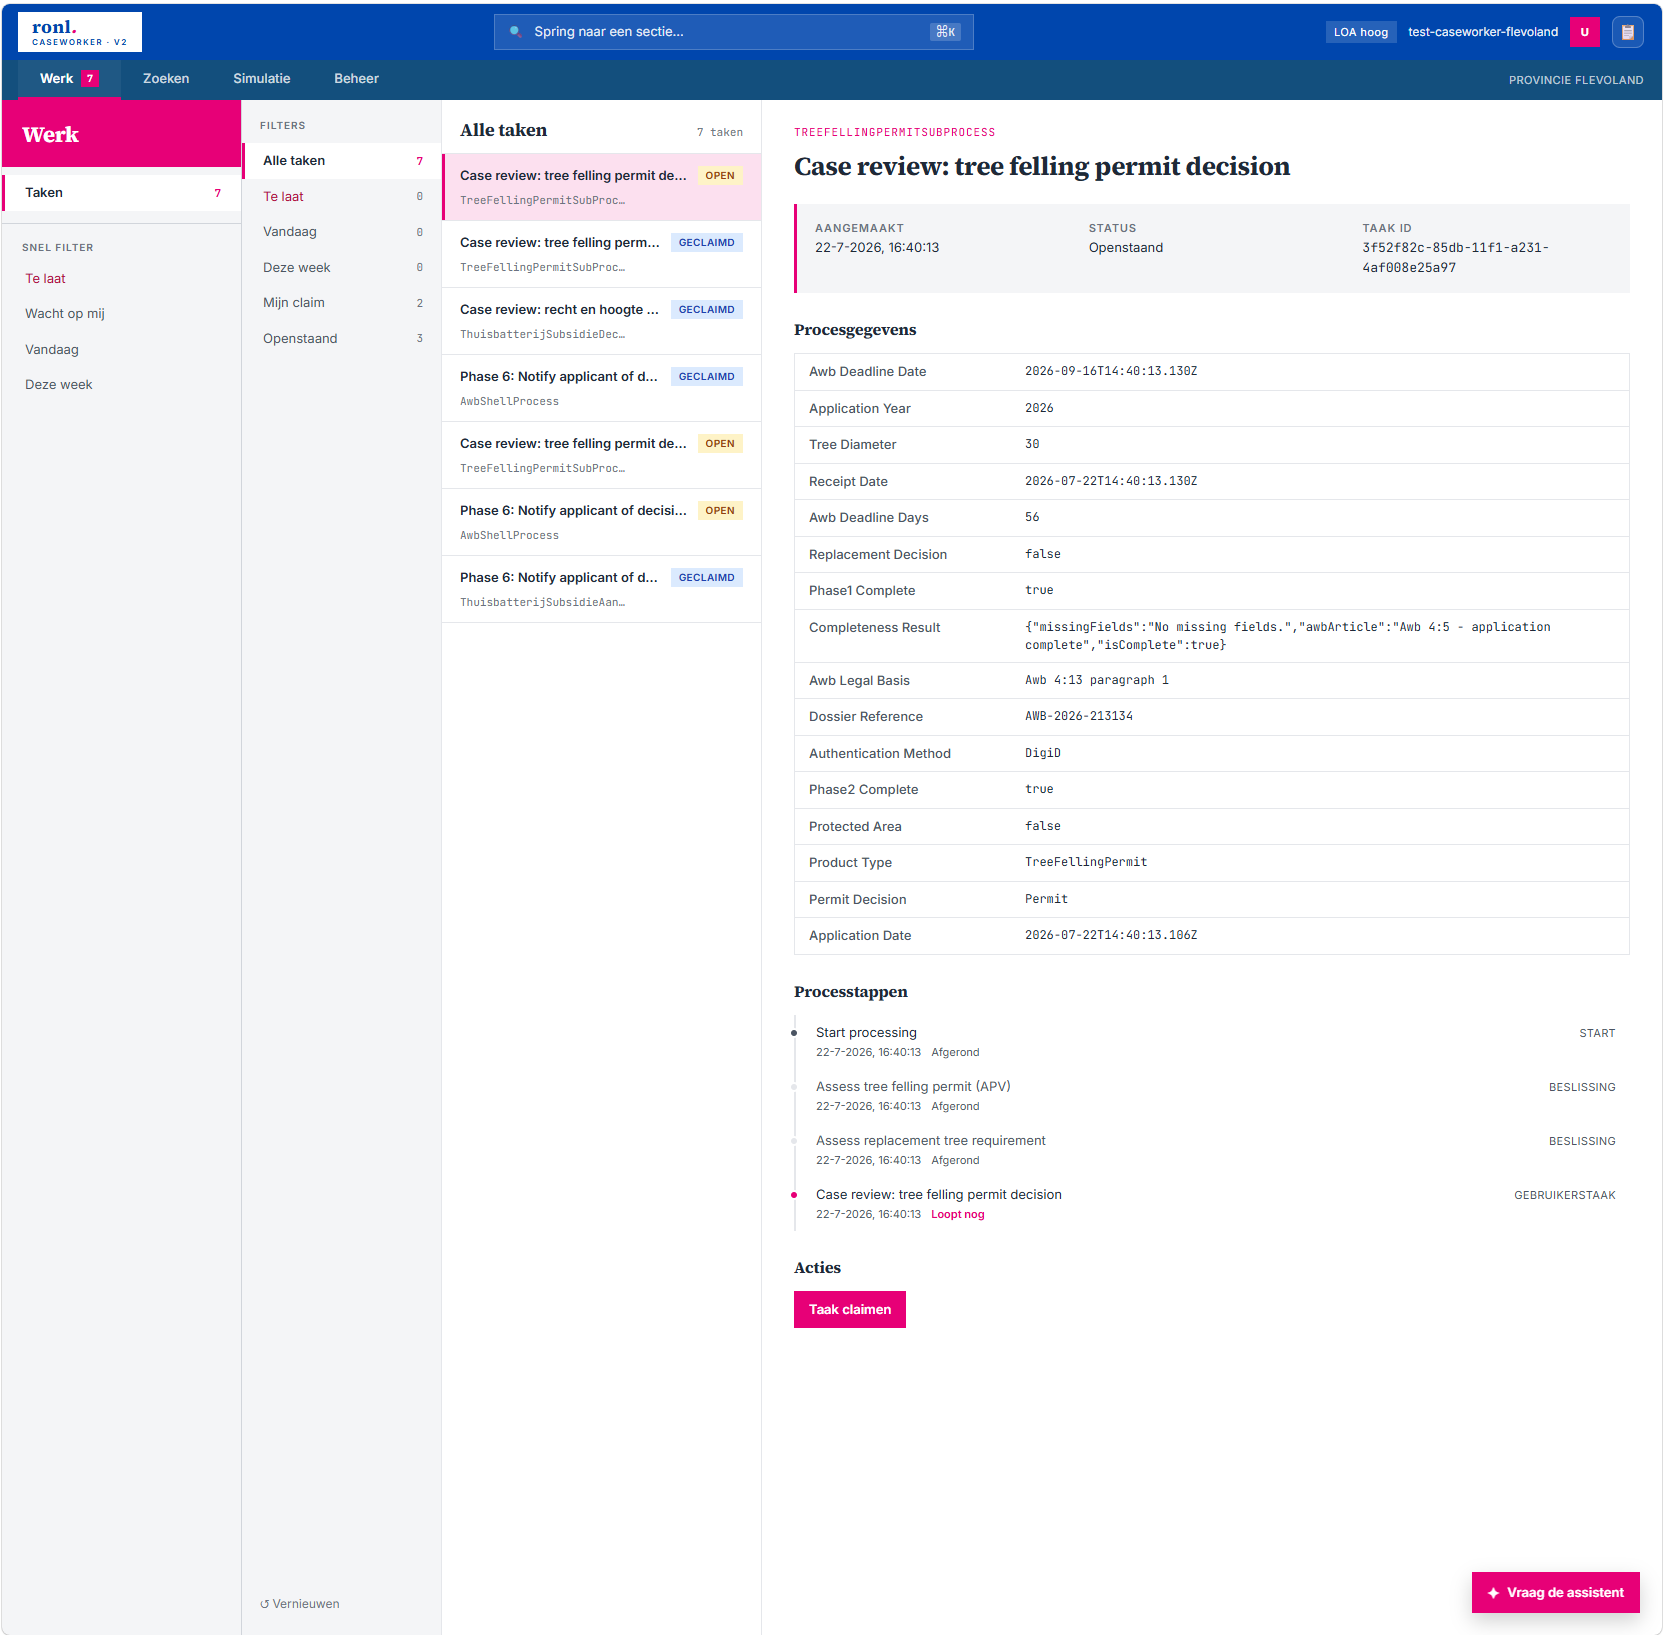
The task list
The inbox has three columns: filters, the list, and the selected task.
The filter column offers Alle taken, Te laat, Vandaag, Deze week, Mijn claim and Openstaand, each with the number of tasks it holds. ↺ Vernieuwen reloads the list. The list is sorted by deadline, soonest first; tasks without a deadline come last.
Each task in the list shows its name, whether it is Open or Geclaimd, the key of the process it belongs to, and its deadline — Deadline followed by the date, or Te laat — followed by the date once it has passed. When the task's process is drawn in lanes and marks its phases, the list also shows the phase the task sits in: Awb-fase 4+5, for example, for a process that follows the Awb phases, or Fase 2 for one that declares its own (see A process's own phases).
Opening a task
Selecting a task opens it on the right: the process key above its name, then Aangemaakt, Deadline, Status and Taak ID.
Procesgegevens — the process variables of the case — is a long table, so it starts folded. Gegevens tonen ▼ opens it and Gegevens verbergen ▲ closes it again. It folds back each time you select another task.
Where the task stands
For a task whose process is drawn in lanes, the task shows where it stands in that process. Which processes do this is set by how their model is drawn — see Which processes show the process view. For any other task, the steps appear as a plain list, as described under Processtappen.
Waar sta ik
Under the task's header, a compact stepper shows the phases of the task's process, with the phases before the current one marked done and the current one highlighted. Most processes follow the eight Awb phases; a process may also declare phases of its own, described below. For an Awb process, the line above the stepper reads, for example:
The first number is the legal phase, the second the position on the stepper. The two differ from phase 6 on because phases 4 and 5 — treatment and decision — are one step. The eight steps are:
| Step | Phase | Name |
|---|---|---|
| 1 | Fase 1 | Rechtsbetrekking |
| 2 | Fase 2 | Ontvangst |
| 3 | Fase 3 | Ontvankelijkheid |
| 4 | Fase 4+5 | Behandeling en besluit |
| 5 | Fase 6 | Bekendmaking |
| 6 | Fase 7 | Betaling |
| 7 | Fase 8 | Ketenproces |
| 8 | Archiefwet | Archivering |
Below the stepper, a caption names the current phase — Fase 6 · Bekendmaking, say — followed by in deelproces and the subprocess's name when the task runs in a subprocess, and by beslistermijn tot and a date when the process has set a decision deadline.
Bekijk proces → opens the process overview at the task's own phase. Clicking a step on the stepper opens it at that phase instead.
A process's own phases
A process can declare its own phases instead of the Awb ones. Besluitvorming onder gedelegeerde bevoegdheid does: its stepper has six steps — Voorbereiding, Advies en toetsing, Memorandum, Ondertekening, Escalatie and Registratie en archivering. The process also names the word that goes before the number, here Fase, and the steps are numbered by position, so the two numbers in the line above the stepper are always the same:
Under each step stands its label, Fase 1 to Fase 6, and the caption below the stepper names the current phase the same way: Fase 2 · Advies en toetsing. The hint in the task list reads Fase 2.
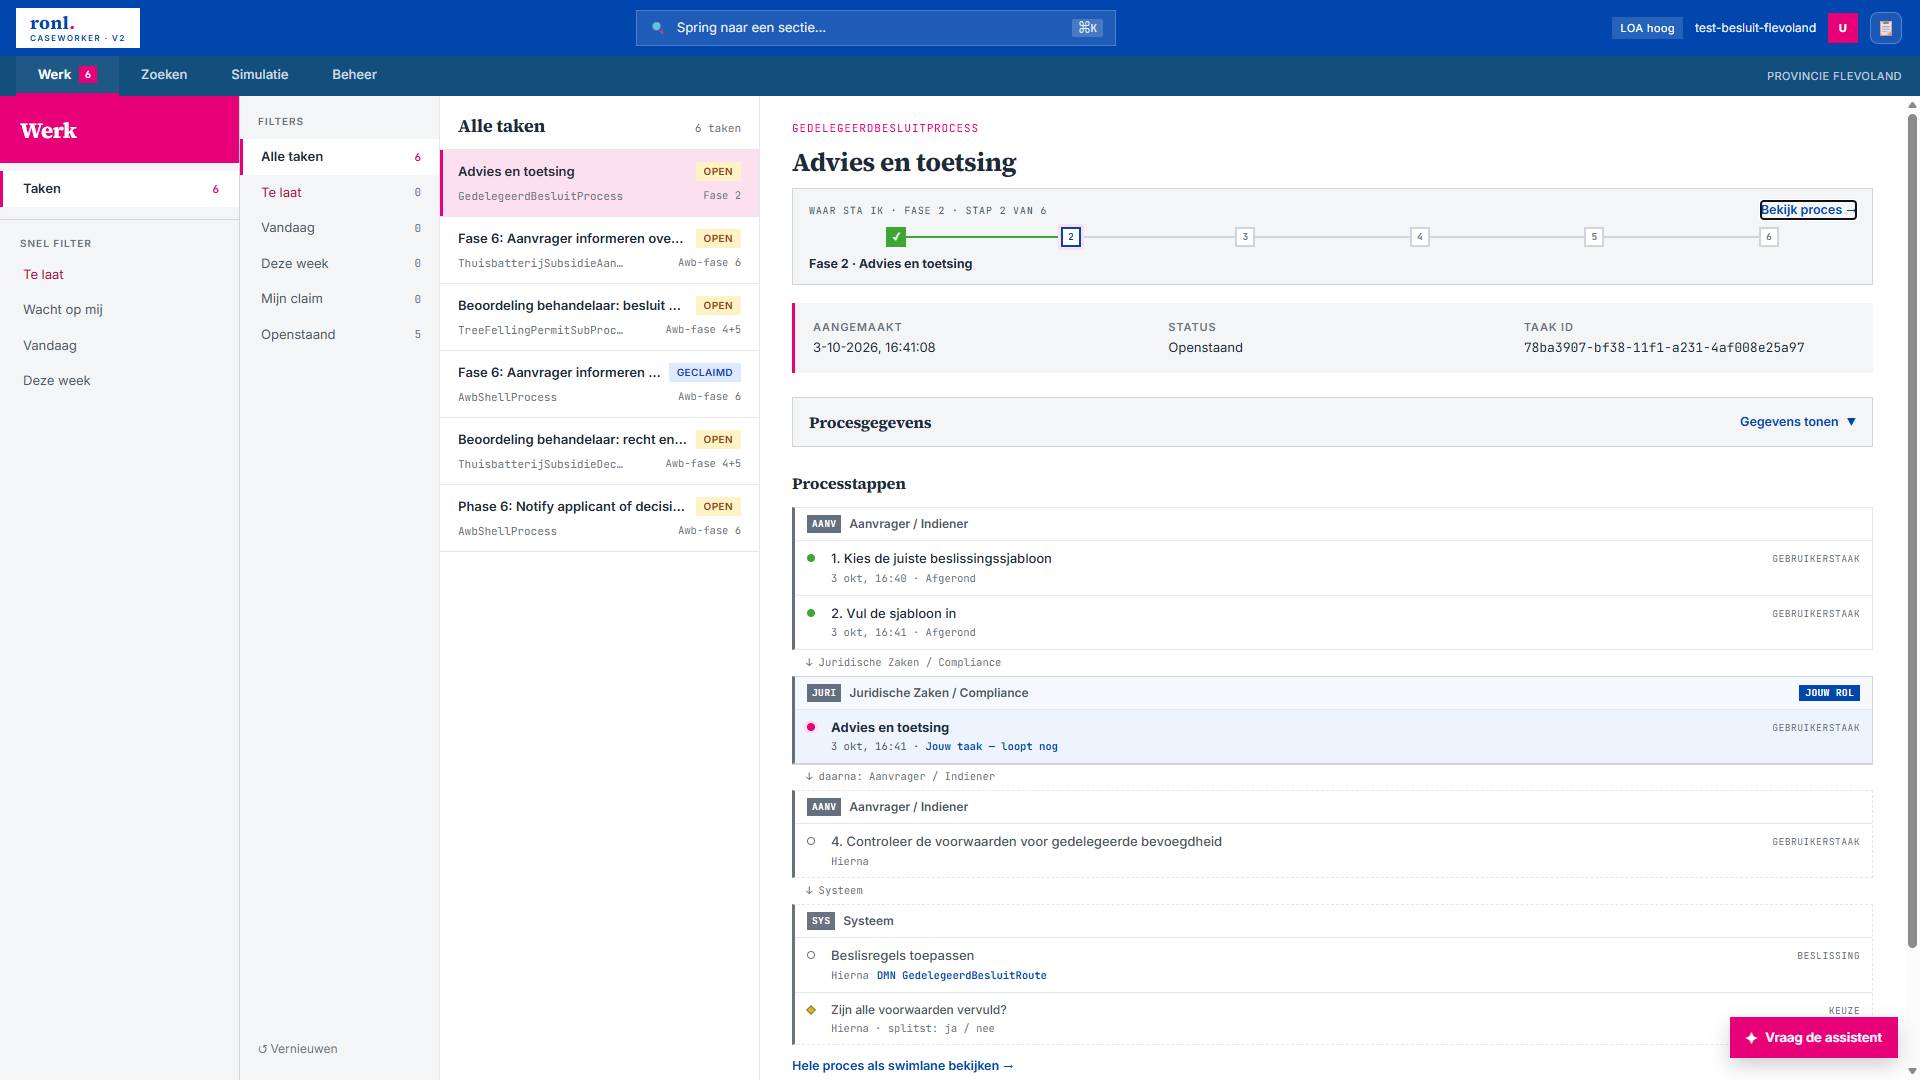
Every step before the current one is marked done, including a phase this particular case skipped: a besluit that needs no memorandum still shows Memorandum as done once it reaches Ondertekening, and a signed besluit shows Escalatie as done once it is being registered.
Processtappen
Processtappen lists what has happened in the case and what comes next. For a process drawn in lanes, the steps are grouped per role:
- Lane groups. Consecutive steps in the same lane form a group, headed by a chip for the lane and its name. The lane you work in — one whose tasks go to a role you hold — is marked jouw rol. A group that runs in a subprocess is tagged deelproces, with its phase.
- Handovers. Between groups, a line says where the work goes:
↓and the next lane,↓ daarna:where the future steps begin,↘ deelprocesand a name where a subprocess starts, and↗ terug in hoofdproces ·and a lane where the work returns. - Step states. A finished step shows when it ended and Afgerond, or Afgebroken when it was cancelled rather than completed. A running step shows Loopt nog; your own task shows Jouw taak — loopt nog; a subprocess that is still running shows Deelproces loopt. Each step also carries its type: GEBRUIKERSTAAK, SERVICETAAK, SCRIPT, BESLISSING, KEUZE or CALLACTIVITY.
- Decisions and documents. A step that evaluates a decision table shows DMN and the table's name; a step that works with a document shows the document's name.
- Choices already made. A choice point that has been passed shows the branch the case took, written out in words — a condition such as
${eligible != true}reads aseligible ≠ true. - Hierna. After the current step, up to three steps show what comes next, marked Hierna. The look-ahead stops at the first choice point, because its outcome depends on work not done yet: it lists the branches instead — Hierna · splitst: followed by each branch. When a subprocess ends, the look-ahead continues in the process that called it.
By default only the two groups before the current one are shown. ▸ n eerdere stappen tonen brings back the earlier ones; the list folds again when you select another task.
Hele proces als swimlane bekijken → at the foot opens the process overview.
For a process that is not drawn in lanes, Processtappen is a plain list of the steps the case has passed, each with its type, its start time and Afgerond, Afgebroken or Loopt nog.
The view draws the most recently deployed version of the process. A step the case ran in an older version, which the current model no longer has, is left out.
The process overview
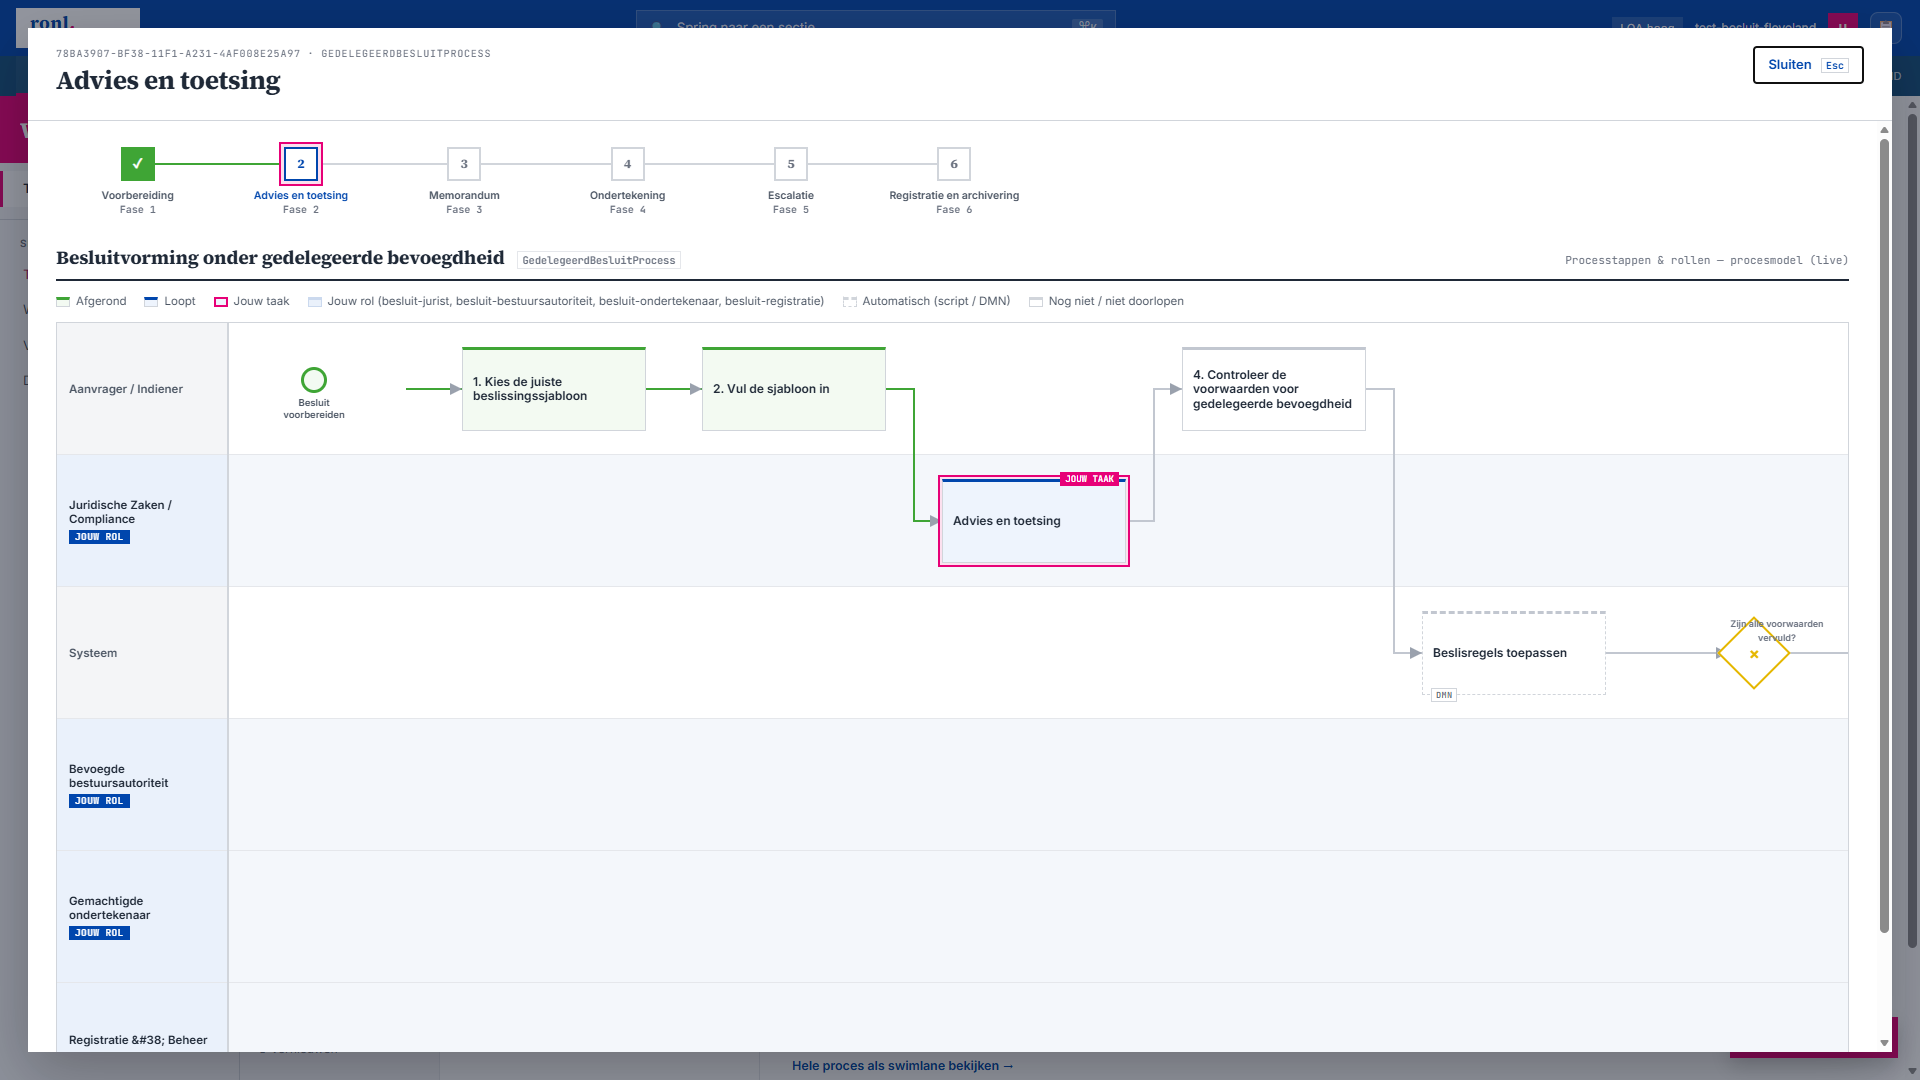
The overview shows the whole process as a swimlane, in a window over the inbox.
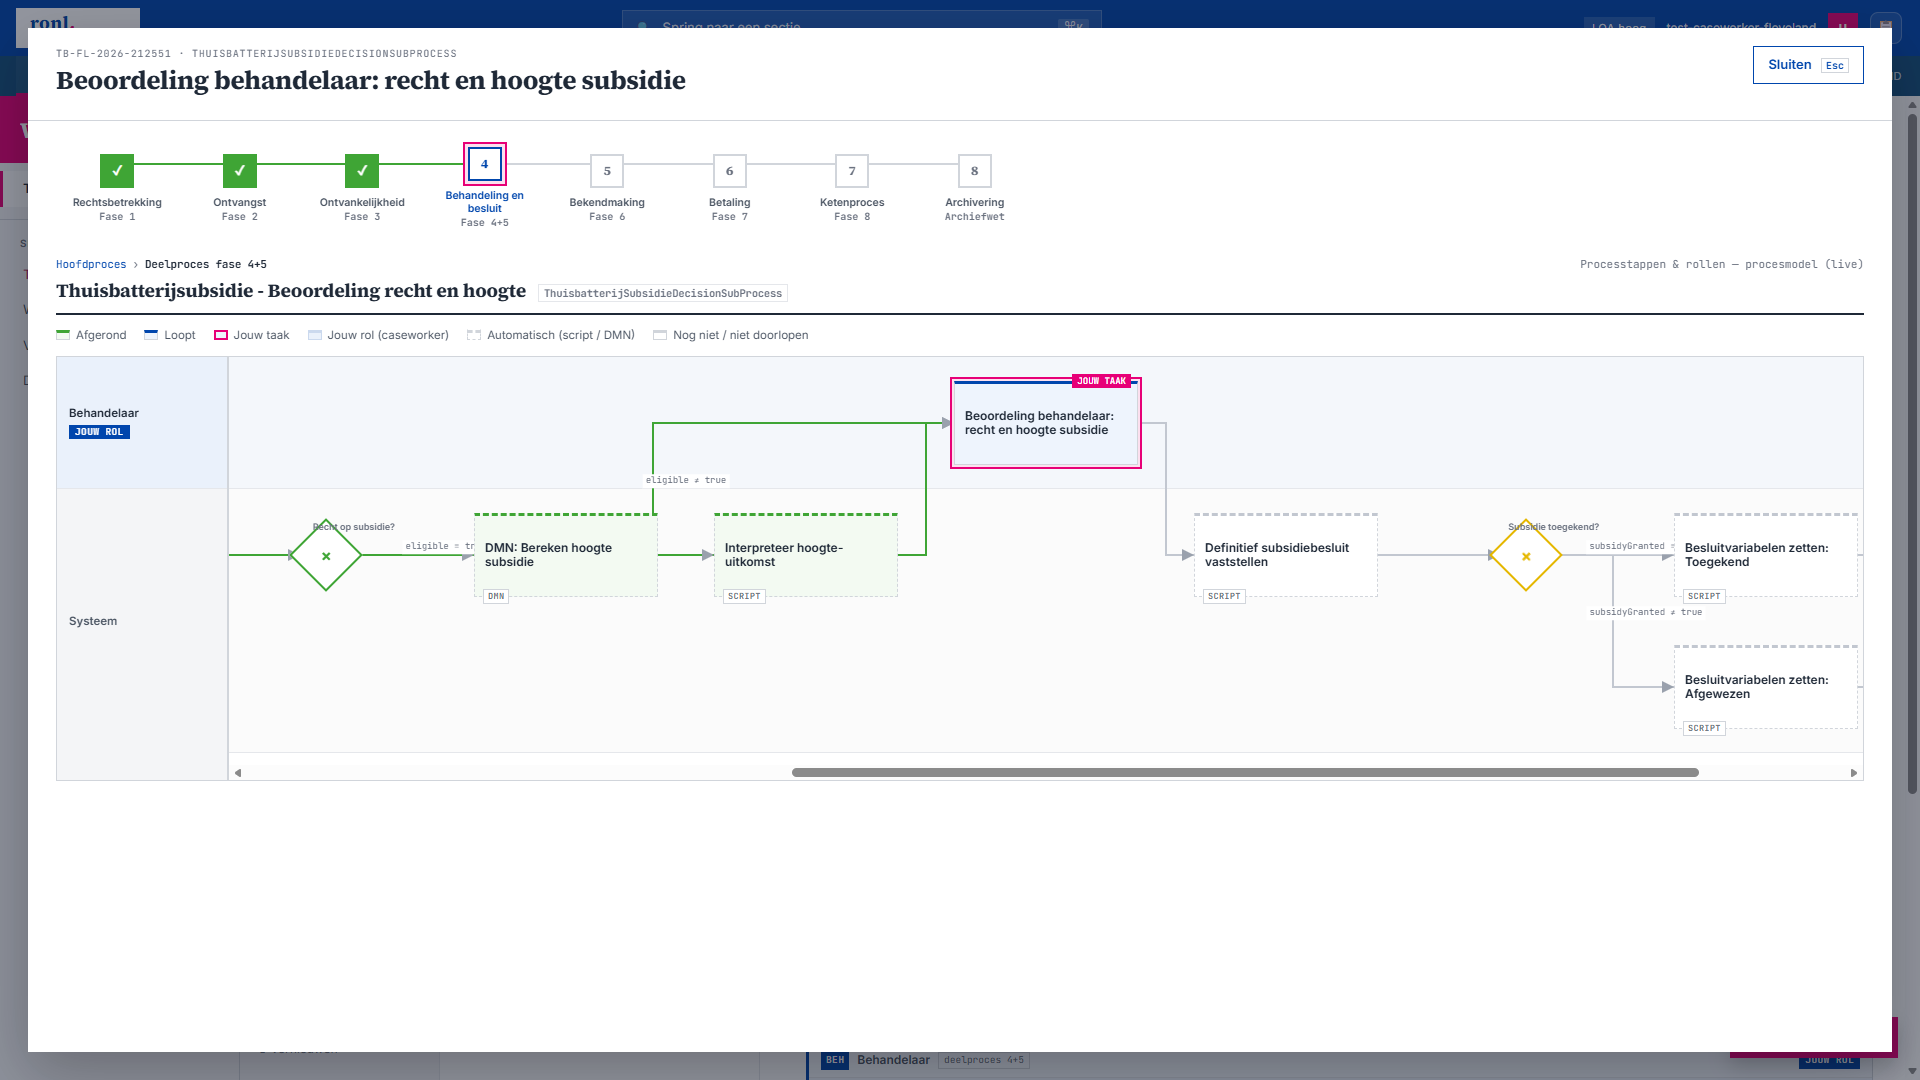
- The full stepper. Along the top runs the phase stepper at full size — the Awb phases, or the phases the process declares itself — where it marks phases and moves between them: picking a phase shows the part of the process it belongs to.
- Main process and subprocess. Where the process calls a subprocess, a breadcrumb — Hoofdproces › Deelproces fase and the phase — switches between the two. A subprocess in the swimlane also has an open ↘ button, which opens it in the same window.
- Title and legend. The process name and key sit above the swimlane, beside Processtappen & rollen — procesmodel (live). The legend reads Afgerond, Loopt, Jouw taak, Jouw rol — followed by the roles you hold in this process — Automatisch (script / DMN) and Nog niet / niet doorlopen.
- Your task. The swimlane scrolls to your task, which is labelled jouw taak, and the lanes you work in are highlighted.
For a process that declares its own phases, the full stepper names them: each step carries the phase's name above its Fase label.
Sluiten, Esc or a click beside the window closes it. While it is open, the keyboard stays inside it; when it closes, the keyboard returns to where it was.
The overview can also be opened with the command palette: with a task selected, press ⌘K (or Ctrl+K) and choose Proces van deze taak bekijken. The command is offered only for a task whose process is drawn in lanes.
Claiming and completing a task
Under Acties, an open task offers Taak claimen. Once claimed, the confirmation Taak geclaimd. appears and the task's form opens in its place. Fill it in and choose Taak voltooien; Taak voltooid. confirms it and the task leaves your list. If saving fails, Opslaan mislukt. says so and the form stays open.
Ondertekenen
Some tasks are completed by signing a document with ValidSign rather than by filling in a form — in Besluitvorming, Onderteken het besluit. The process model says which tasks these are. Once you have claimed such a task, Acties shows a signing panel instead of the form.
Right after the claim, and each time you select a claimed task, Ondertekening controleren… appears for a moment while the board asks whether the task must be signed. Neither the form nor the panel shows until the answer is in, so a task that needs a signature can never be approved through its form.
The panel reads Deze taak vereist een digitale handtekening. and offers two ways to sign:
- Onderteken nu prepares the request (Ondertekenverzoek wordt voorbereid…) and opens the ValidSign signing screen inside the panel.
- Stuur per e-mail sends the request to your e-mail address instead: Het ondertekenverzoek is per e-mail verstuurd naar and the address, followed by Deze taak wordt automatisch afgerond zodra er getekend is. Coming back to the task later shows Er staat al een ondertekenverzoek uit voor deze taak., and the panel does not offer a second request.
There is no Taak voltooien: the task completes itself. Once the document is signed, Taak voltooid. appears and the task leaves your list. If the signer declines, the panel reads De ondertekenaar is niet akkoord gegaan met dit document. and the task completes as well, recording the refusal, and leaves your list; the inbox confirms it with Niet ondertekend — het proces gaat verder via de afwijzingsroute. What happens next is up to the process. In Besluitvorming a declined signature does not send the besluit back for rework: it goes forward to the bevoegde bestuursautoriteit, as described under How a besluit runs.
Signing needs an e-mail address on your account. Without one, the panel says Uw account heeft geen e-mailadres geregistreerd. and that an administrator has to add it; trying again does not help.
The assistant
Vraag de assistent, at the side of the board, opens the Assistent panel beside your work. Closing and reopening it keeps the conversation, and so does reloading the page within the same browser session. The panel can be widened or narrowed by dragging its edge.
Where the platform is connected to eDOCS, the assistant can look up workspaces and documents there, and it does so with your own account: it sees what you may see in eDOCS, no more. That needs you to have signed in with Inloggen met uw Flevoland-account, or with the Flevoland-account button on a board card. Signed in another way, the assistant answers that eDOCS is only available after signing in with your Flevoland account; when your Flevoland session has expired, it says Uw Flevoland-sessie is verlopen. Log opnieuw in om eDOCS te gebruiken. — sign out and in again with your Flevoland account. When eDOCS itself refuses your account, the assistant says so too.
Besluitvorming
Besluitvorming onder gedelegeerde bevoegdheid is how a medewerker takes a decision under delegated authority: you prepare the besluit, Juridische Zaken reviews it, and a gemachtigde ondertekenaar signs it. When the besluit falls outside the delegated authority, it goes to the bevoegde bestuursautoriteit instead. Unlike a request a resident submits from outside, such as a kapvergunning, this process starts on the board.
It lives in the Beheer mode, in the rail group Besluitvorming, which is offered to Provincie Flevoland. The group has three items:
| Item | Shown to |
|---|---|
| Besluit voorbereiden | The indiener (besluit-indiener) |
| Lopende besluiten | Anyone who holds one of the five besluit roles |
| Afgeronde besluiten | Anyone who holds one of the five besluit roles |
Who does what
The process has a lane per role. Each lane's tasks go to the role named below, so a task appears in your Taken inbox only when you hold that role. Rollen & rechten, under Account, shows which of these roles you have.
| Lane | Role | Tasks |
|---|---|---|
| Aanvrager / Indiener | besluit-indiener |
1. Kies de juiste beslissingssjabloon, 2. Vul de sjabloon in, 4. Controleer de voorwaarden voor gedelegeerde bevoegdheid, 5. Vul het memorandum in, 6. Dien het besluit in voor ondertekening, Escaleren naar bevoegde bestuursautoriteit |
| Juridische Zaken / Compliance | besluit-jurist |
Advies en toetsing, Verstrek advies / akkoord |
| Bevoegde bestuursautoriteit | besluit-bestuursautoriteit |
Neem besluit |
| Gemachtigde ondertekenaar | besluit-ondertekenaar |
Onderteken het besluit |
| Registratie & Beheer | besluit-registratie |
Ontvang en registreer, Archiveer |
| Systeem | — | Beslisregels toepassen, carried out automatically |
Preparing a besluit
Besluit voorbereiden opens a short explanation under the heading Besluitvorming onder gedelegeerde bevoegdheid, and a button Besluit voorbereiden that starts the process. Besluit in voorbereiding confirms it: the first task, Kies de juiste beslissingssjabloon, is now in your task list. Nog een besluit voorbereiden returns to the start. If the process cannot be started, Het besluit kon niet worden gestart. says so.
How a besluit runs
The process passes through six phases of its own, which the Waar sta ik stepper shows:
- Voorbereiding. The indiener chooses the decision template and fills it in.
- Advies en toetsing. Juridische Zaken advises on the draft, after which the indiener checks the conditions for delegated authority. Decision rules then pick the route: when not every condition is met, the besluit is escalated; when a formal memorandum is required, it goes to the memorandum; otherwise it goes straight to signing.
- Memorandum. The indiener fills in the memorandum and Juridische Zaken gives its advice or agreement. When it agrees, the besluit goes on to signing; when it does not, the besluit is escalated.
- Ondertekening. The indiener submits the besluit and the gemachtigde ondertekenaar signs it in the inbox, as described under Ondertekenen. A signed besluit goes to registration. A declined signature escalates the besluit: it does not return to the indiener for rework.
- Escalatie. The indiener completes Escaleren naar bevoegde bestuursautoriteit, and the bevoegde bestuursautoriteit takes the decision in Neem besluit.
- Registratie en archivering. Registratie & Beheer receives and registers the besluit, then archives it.
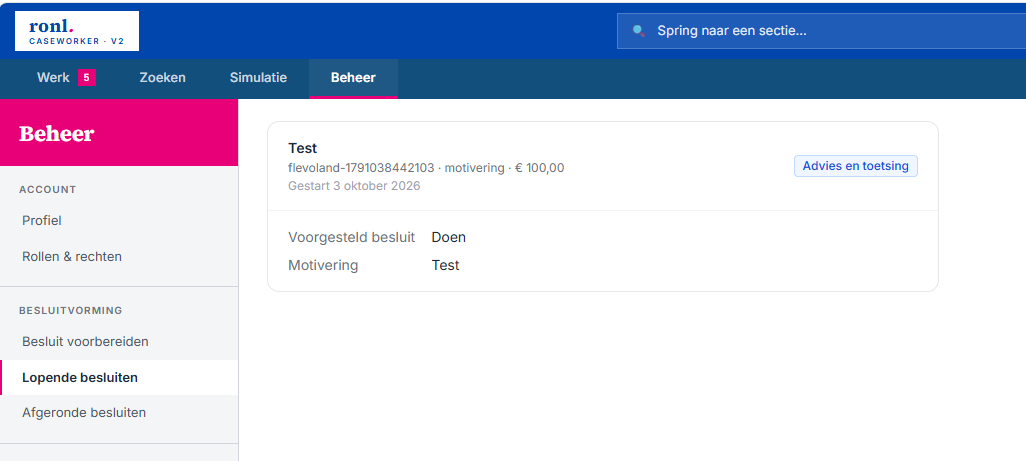
Lopende and Afgeronde besluiten
Lopende besluiten lists the besluiten still running, newest first; Afgeronde besluiten the completed ones, most recently completed first. Both show every besluit of your organisation, not only the ones you worked on.
Each besluit shows its subject, then its key, type and financial consequences in euros, and the date it was started (Gestart) or completed (Afgerond). On the right, a badge shows the step a running besluit is at — the name of its open task — or the outcome of a completed one:
| Outcome | Meaning |
|---|---|
| ondertekend | The gemachtigde ondertekenaar signed the besluit |
| geëscaleerd — genomen | The bevoegde bestuursautoriteit took the besluit |
| geëscaleerd — afgewezen | The bevoegde bestuursautoriteit turned it down |
For an escalated besluit, the bestuursautoriteit's decision is the outcome, even when a declined signature led to the escalation.
Clicking a besluit opens the details it is decided on: Kenmerk, Zaaknummer, Voorgesteld besluit, Motivering and Reden escalatie, each shown only once it has been filled in. A besluit with none of them yet shows Nog geen gegevens vastgelegd. Clicking it again closes it.
An empty list reads Geen lopende besluiten. or Geen afgeronde besluiten. If the list cannot be loaded, De besluiten konden niet worden geladen. appears with Opnieuw proberen.
Which processes show the process view
The process view — lane groups and the overview — appears only for a process whose deployed BPMN model is drawn in lanes, with the user tasks inside them. jouw rol needs, in addition, that a lane's tasks are assigned to a role by name. The Waar sta ik stepper and the phase hint in the list need the model to mark its steps with a phase: an Awb phase, or one of the phases the process declares itself — a process uses one scheme or the other, never both. A step without a marker of its own takes the latest phase among the steps leading to it; a task in a subprocess without markers of its own takes the phase of the step that called the subprocess. A process with lanes but no phase markers shows its steps per role without the stepper; a process without lanes shows the plain list. Whether a given task shows the view therefore depends on how its process is modelled, not on the task. How a model is marked up for this is described in BPMN Design Criteria.
For how earlier versions of the board worked, see Caseworker Dashboard and Caseworker Dashboard (V2).